Voice chat is an important feature for all online games. Especially for competitive games like Valorant, having proper communication between teammates is the most important factor when it comes to winning. It allows you to set up ganks, smokes as well as keep everyone updated on the current situation.
Alternatively, if, for some reason, your teammates can’t hear you talking, it can cost you a game as well. There can be many reasons why the voice chat is not working for you.
However, the first thing you need to do is make sure that your microphone itself doesn’t have any problem. If your audio device is working perfectly fine, then we can move on to possible causes and fixes for this issue.
Different Types of Voice Chat
There are two types of voice chats in Valorant. The first one is Party voice chat, in which only the members of your party can hear each other. And the second one is Team voice chat, in which all team members can hear each other while talking over the microphone.
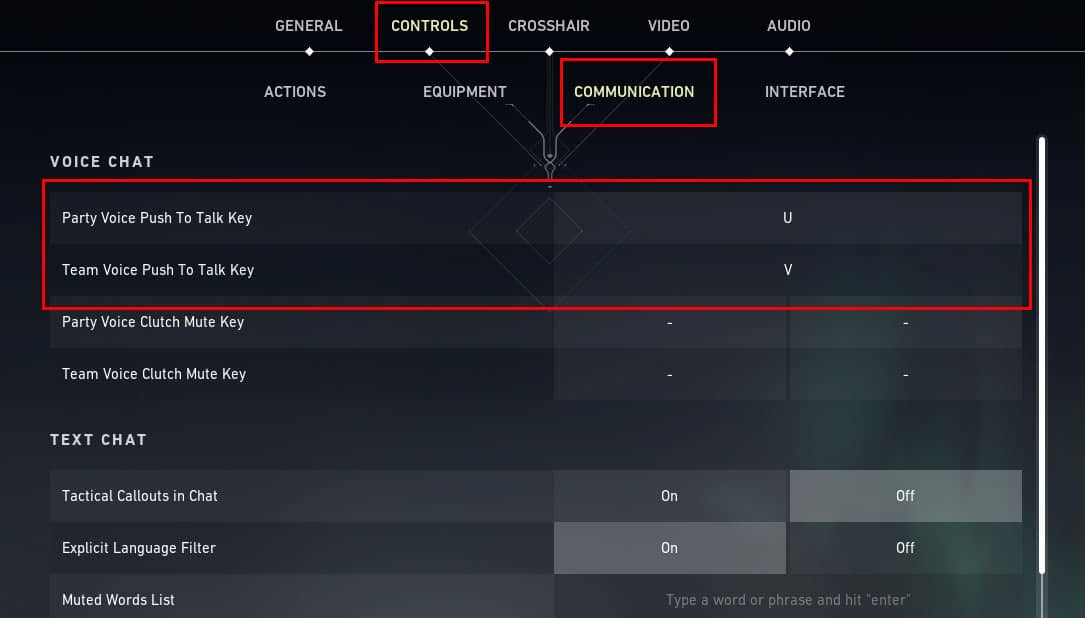
You can set up a hotkey for both types of voice chat. To do so:
- Launch Valorant and open the Settings menu.
- Click on the CONTROLS tab, then select COMMUNICATION.
- Now, under the Voice Chat option, you can assign a hotkey for both Party and Team voice chat.
Your teammates and party members will be able to hear you talk when you press down the specific hotkey.
How to Fix Valorant Voice Chat Not Working
If the voice chat feature doesn’t seem to be working, even when you are talking when pressing down the specific hotkeys, then the problem might be in the audio settings in Valorant or your Windows itself.
If that is the case, then you can try these methods to see if there is anything wrong with the audio settings and fix this issue.
See if the Voice Chat Feature Is Turned off
First things first, you need to make sure that you haven’t turned off the voice chat feature by accident. If the voice chat feature is turned off, then you can’t communicate with your friends no matter what you do.
To check the voice chat feature in Valorant:
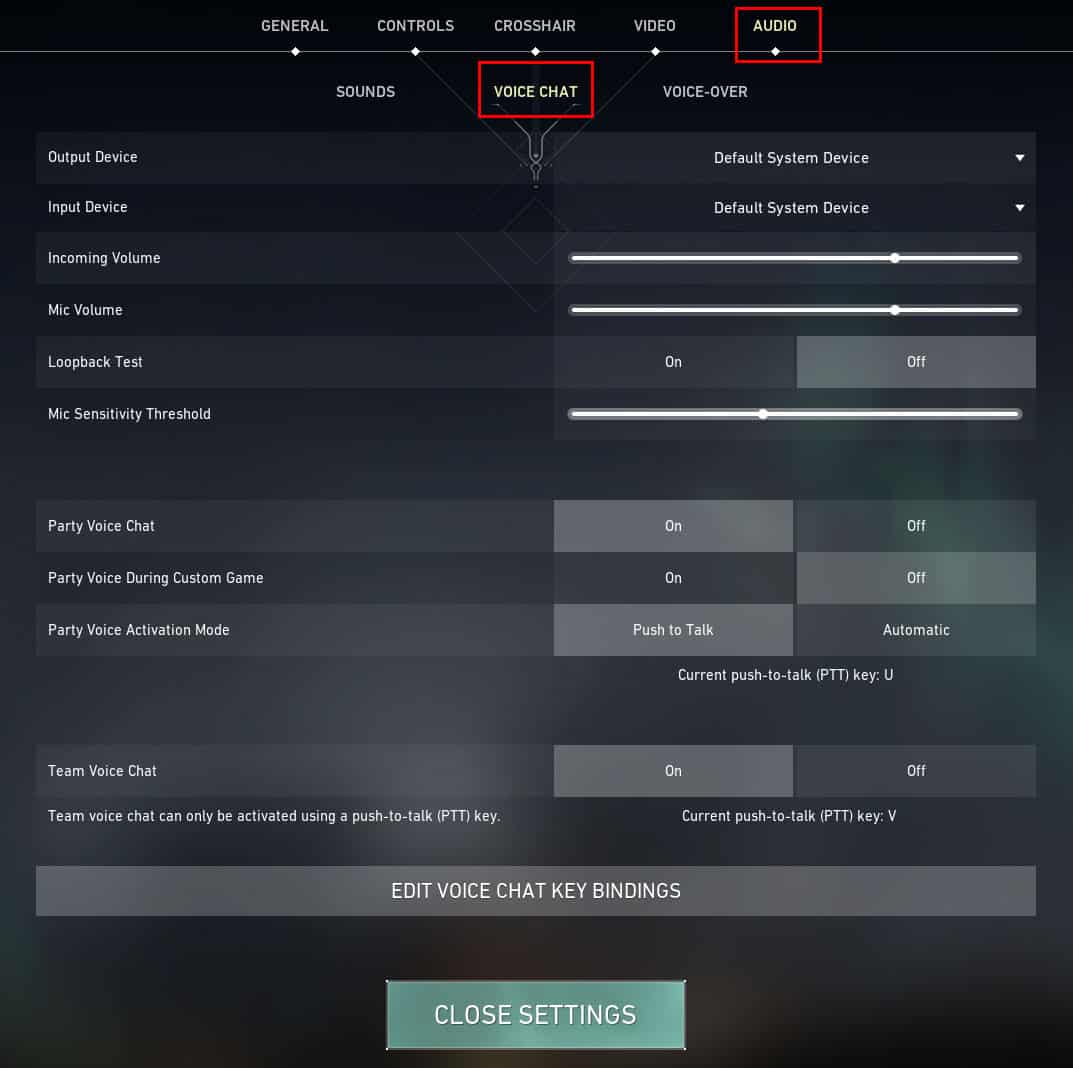
- Launch Valorant and go to the Settings menu.
- Select the Audio tab and click on the VOICE CHAT option.
- Now, you’ll be able to see all the options related to voice chat in Valorant. See if any settings are off, and make sure to turn on all the voice-chat settings.
Now, check if your friends can hear you talk by pressing down the hotkey.
Reset Valorant’s Default Audio Settings
The problem may also arise if Valorant is selecting the wrong audio device. So it is important to select the device that you’re using for communicating.
To change your Valorant’s default audio settings:
- Open Valorant and go to its Settings menu.
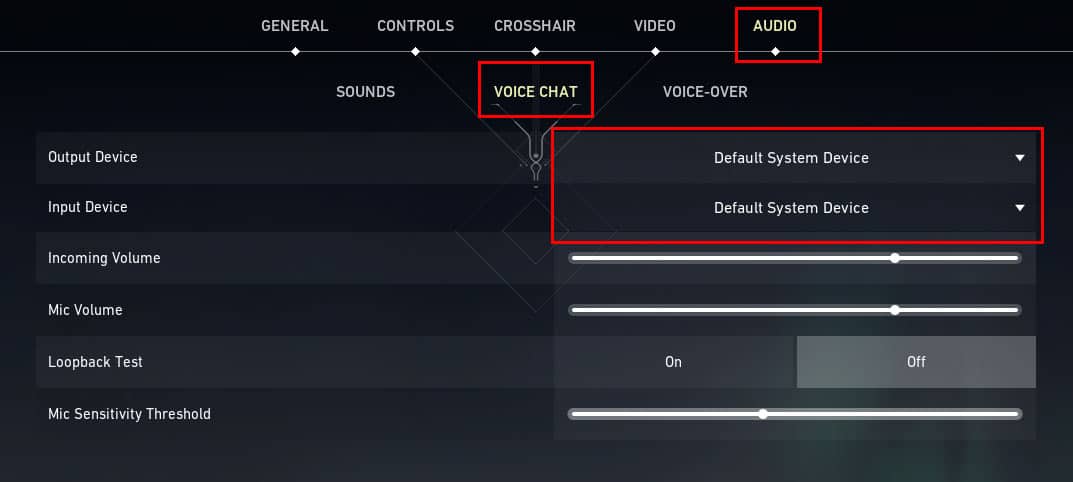
- Click on the Audio tab and select the VOICE CHAT option once again.
- Now, on the Output and Input Device option, make sure your headphone and microphone are selected. If you’re confused about it, then just set it to Default System Device.
- You can also adjust the volume and sensitivity of your microphone as per your preference.
Allow Valorant to Access Your Microphone
Your Windows may be preventing certain programs and applications from using the microphone as well. It is worth checking out if any settings are interfering with the voice chat and also allow programs to access the microphone when they need it.
To allow programs to access Microphone:
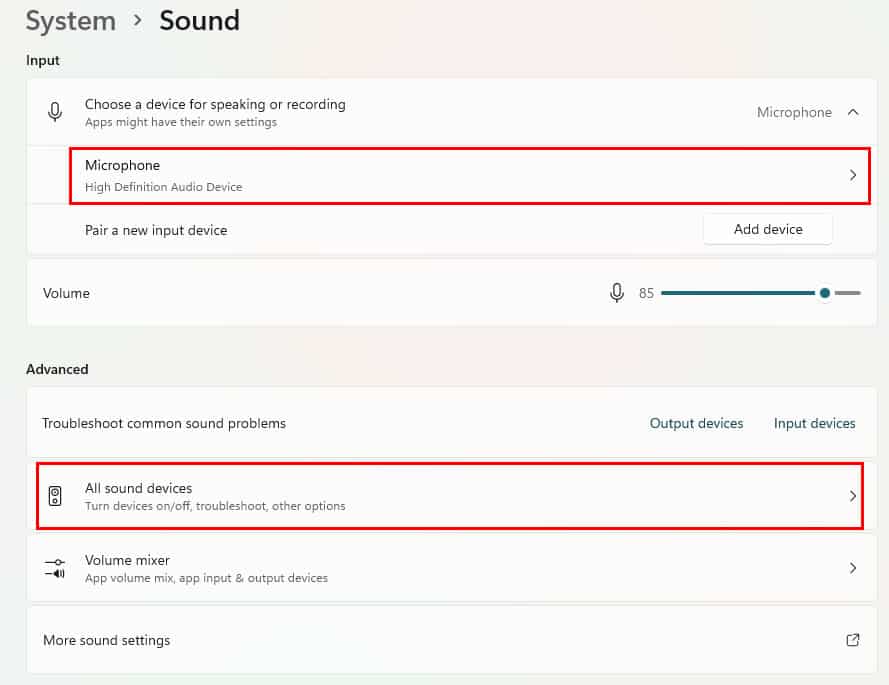
- Right-click on the speaker icon from the bottom-right corner of your Taskbar and select the Sound settings option.
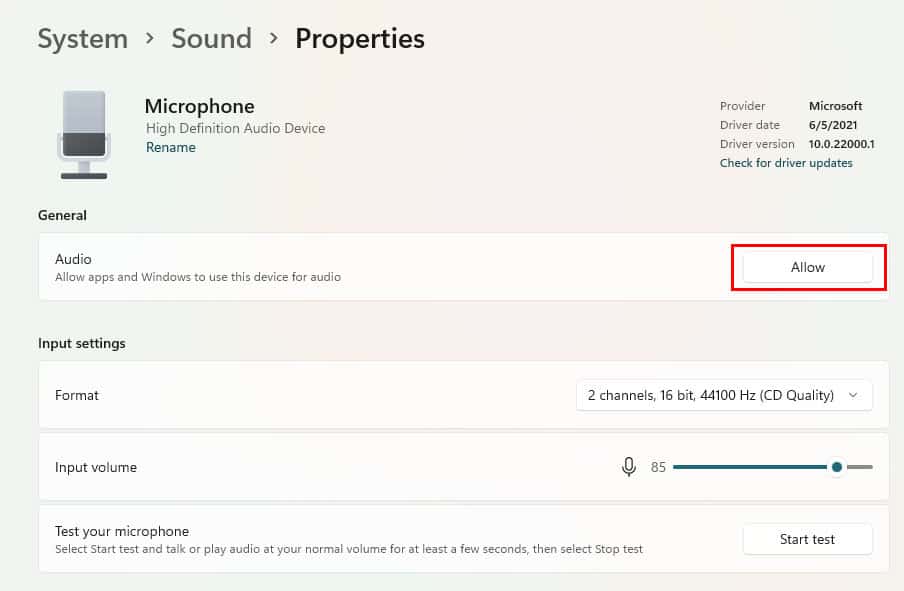
- Under the Input section, click on the Microphone option. (If you can’t see it under the Input section, then click on All sound devices under Advanced.)
- Now, select Microphone.
- Under the General tab, click on the Allow button, next to Allow apps and Windows to use this device for the audio option.
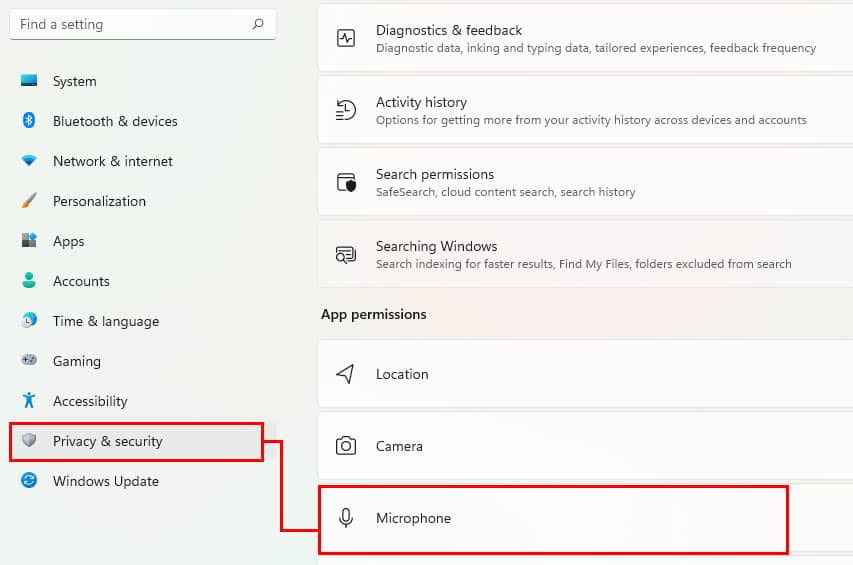
- Now, click on the Privacy & security tab, then scroll down till you see Microphone and click on it.
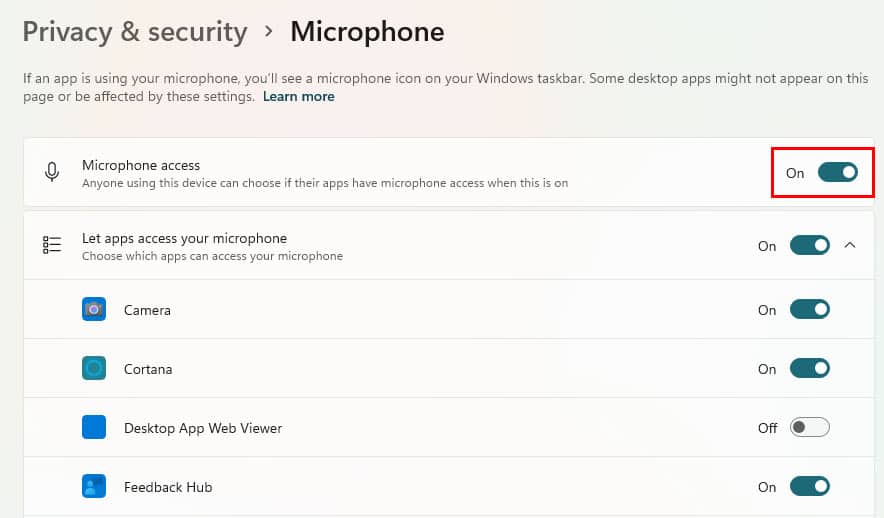
- Make sure the Microphone access option is turned on.
Update Your Audio Drivers
Outdated or corrupted drivers can cause a lot of issues on Windows. So, it is very important that you have the latest and updated drivers for your audio devices.
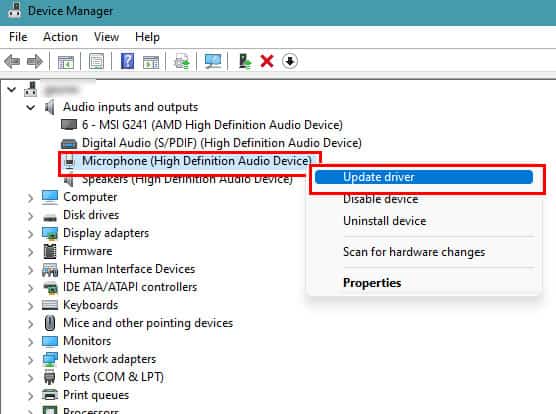
- Right-click on the Start menu, then select Device Manager from the list of options.
- Expand the Audio inputs and outputs option by clicking on the small arrow icon.
- Now, select Microphone and right-click on it.
- Select the Update driver option.
- Now, you’ll see a popup to choose whether you want to update your driver manually or automatically. Select Search automatically for the drivers option and wait for Windows to update the driver.
Allow Riot Client and Valorant through Windows Defender Firewall
You may also face this issue if the game is unable to connect to the voice servers due to your firewall. It is important to allow Valorant as well as all Riot programs through the Windows Firewall to avoid any server-related issues.
- Press the Windows key on your keyboard to open the Start menu.
- Then, type ‘
Windows Defender Firewall’ in the search bar and click on it. - Now, click on Allow an app or feature through the Windows Defender Firewall tab from the left.
- Click on the Change settings button, then select Valorant and any Riot Client apps, and click Remove.
- Now, add them back by clicking on Allow another app button.
- Locate the Valorant app by browsing through: “
C:\Riot Games\VALORANT\live\VALORANT.exe,” then click OK. - Once Valorant has been added to the exception list, check both the Private and Public boxes.
- Now, add Riot Vanguard to the exception list as well by browsing through “
C:\Program Files\Riot Vanguard\vgc.exe”, then click OK. - Do the same thing for the Riot Launcher as well by browsing through: “
C:\Riot Games\Riot Client\RiotClientServices.exe”, then click OK. - Now, click on OK to confirm your actions.
Check Your Audio Settings
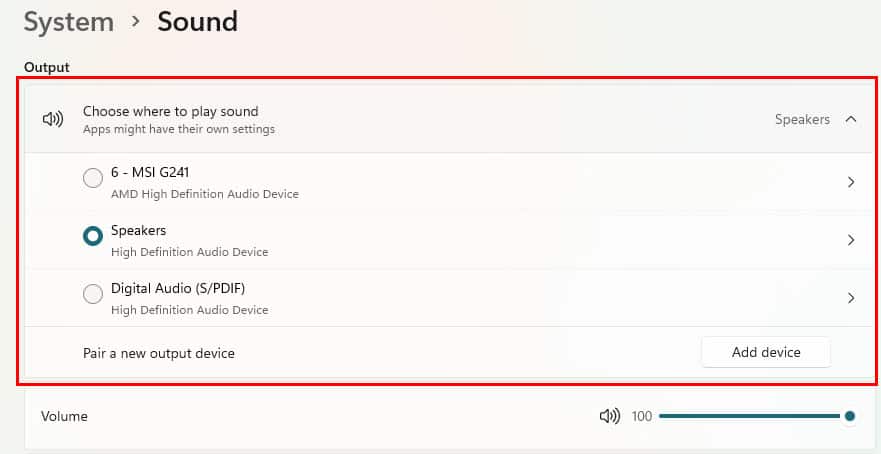
Sometimes, the problem may arise when you don’t have the correct audio device selected. To check if Windows is selecting the wrong audio device and select the correct one:
- Right-click on the speaker icon located at the bottom-right corner of the Taskbar.
- Select Sound Settings.
- Now, under the Output section, select the appropriate device for the audio. (i.e., your headphone or microphone)
Run Your PC in Clean Boot
If any other program or services are interfering with the voice chat feature, then running the game after clean boot may help solve it. If you can communicate after booting Windows on clean boot, you can then check for the program that is causing it and remove it from your device.
To do a clean boot on Windows:
- Press Windows and R together to open the Run Command Interface.
- Now, type ‘
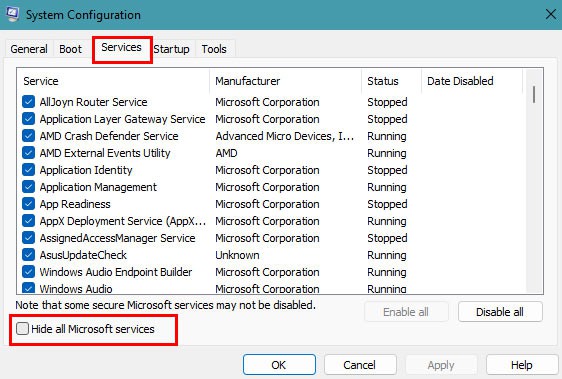
msconfig’ in the search box, then hit Enter. - It will now bring up the System Configuration window. Click on the Services tab and check the Hide all Microsoft services option.
- Now, click on the Disable all button to disable all services on your PC.
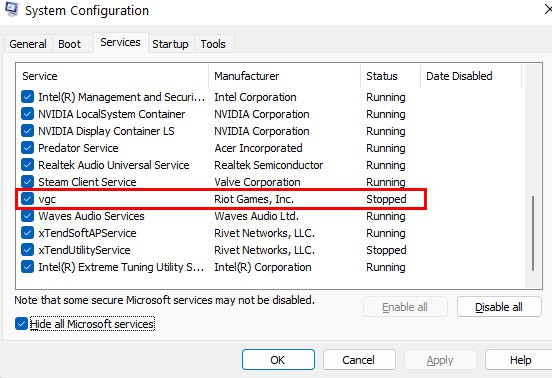
- From the list of services, scroll down till you see vgc and check the box next to it.
- Now, click Apply > OK.
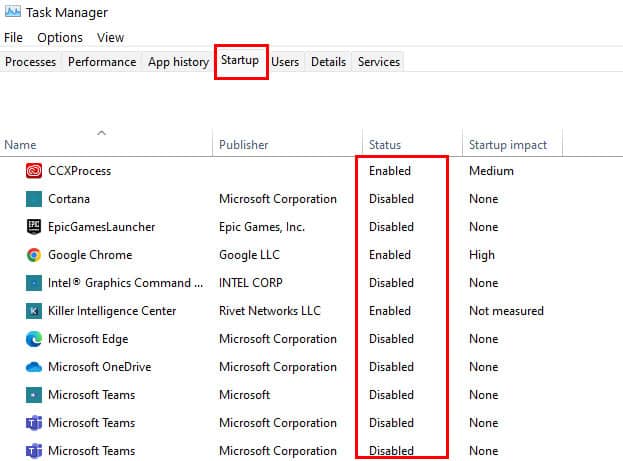
- Exit the window, and open your Task Manager.
- Then, click on the Startup tab and disable all programs that may be interfering with the voice chat feature.
- Now, exit the Task Manager and restart your Windows.

