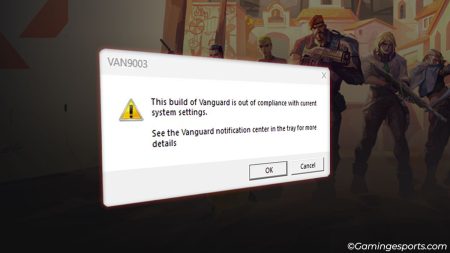
Valorant error code (VAN 1067) primarily occurs when you update your PC from Windows 10 to Windows 11. Windows 11 users face this issue in Valorant’s launch sequence. You can’t access or log in to your game when you face this error.
Connection error message pops up when the user tries to launch the game itself. This Error can be caused by numerous reasons depending upon the system. And they are also hard to deal with as it is extremely difficult to find fixes that work for everyone.
What Causes Valorant Error Code VAN 1067
We face this error if Trusted Platform Module (TPM) 2.0 or Secure Boot is not enabled primarily on Windows 11. Secure Boot is a feature that protects your computer from security threats.
Likewise, TMP 2.0 is also necessary for Valorant to be playable in windows 11. You need to enable both of these from your BIOS menu to run Valorant smoothly on your system.
Many other issues may also cause the Valorant VAN 1067 error to pop up. Few of those are:
- Poor internet connection or interference.
- Third-party applications such as antivirus, BLITZ, and more.
- Domain Name System (DNS).
- Interference of Startup applications such as discord.
- Pending windows updates.
- Outdated and Missing Device drivers.
- Virtual Machine Application or Enabled CPU Virtualization.
- Improper Installation of Game.
Potential Fixes for Valorant Error Code VAN 1067:
The ultimate fix for Valorant VAN 1067 error is to enable Secure Boot and TMP 2.0. It is also good to keep your windows up to date and drivers’ updates in check.
It is frustrating for a player to face this issue and not know how to go on with it. However, there are plausible solutions to VAN 1067 errors and how to resolve them. The following fixes can help you run the game on Windows 11 or 10 and resolve the error.
Enable Secure Boot, TPM 2.0
The prime fix to the error code is to enable your Trusted Platform Module (TPM)2.0 and Secure Boot from the BIOS setting. To begin with, you need to reboot your computer and enter your BIOS.
You will need a TPM security chip in order to install Windows 11. The main function of TPM is to provide security features for computer’s Hardware.
Motherboards of different brands can have different hotkeys assigned to open up BIOS. Google can always be of help if you are having a hard time accessing BIOS. F2, F10, and F12 are the most commonly used hotkeys to access your BIOS. Click the hotkeys as soon as your computer starts booting up.
After accessing your BIOS setting,
- Navigate to the Advanced Setting.
- Then proceed to the Boot Option and search for “Secure Boot.”
- Select and open Secure Boot.
- Proceed to select any UEFI option or UEFI Mode option available to you.
- Also, look out for the Security Tab and select it.
- Locate TPM and enable it.
- Save and Exit.
- Reboot your computer.
You can also enable TPM 2.0 from the Device Manager in the control panel.
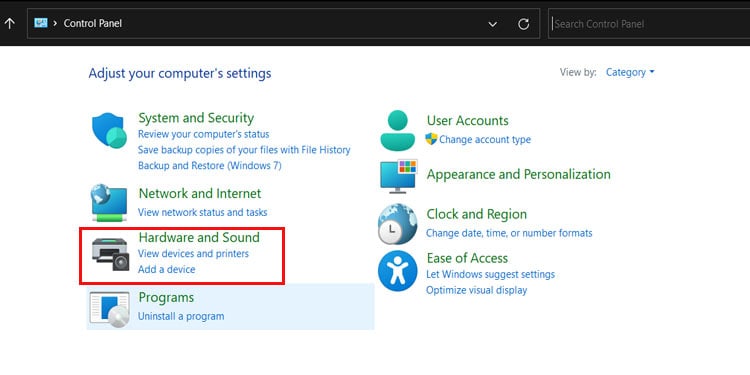
- Navigate to the Control Panel and select Hardware and Sound.
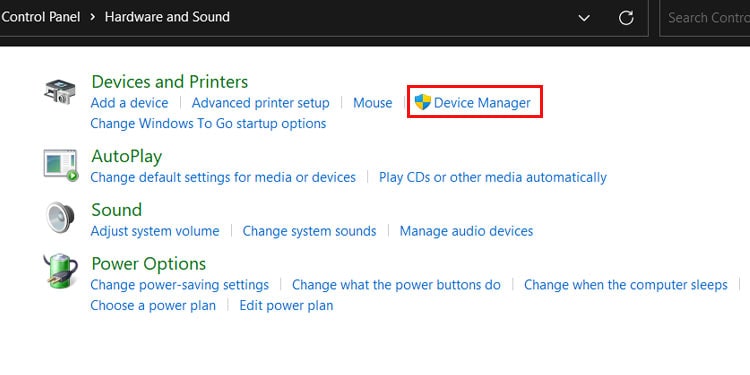
- Proceed to Device Manager under Devices and Printers.
- The system should detect TPM 2.0 if you have enabled TPM in UEFI.
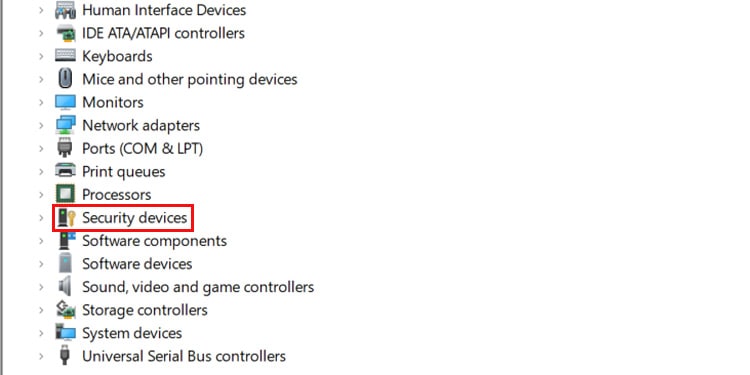
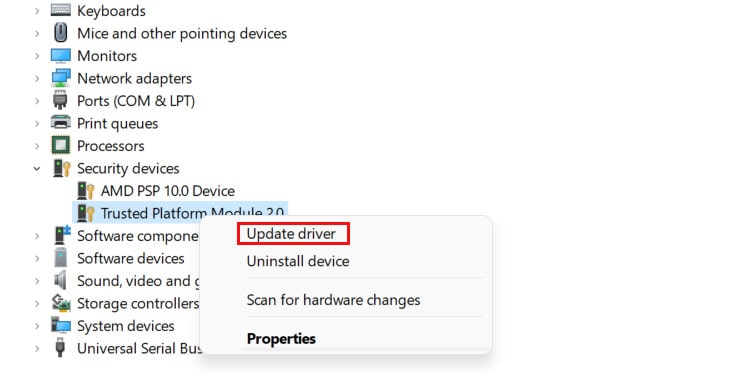
- To verify, you will find TPM 2.0 under Security Devices in the Device Manager.
- If TPM 2.0 is facing some kind of error or not detected, make sure you update the driver.
- Right Click in TPM 2.0 and select Update Driver option.
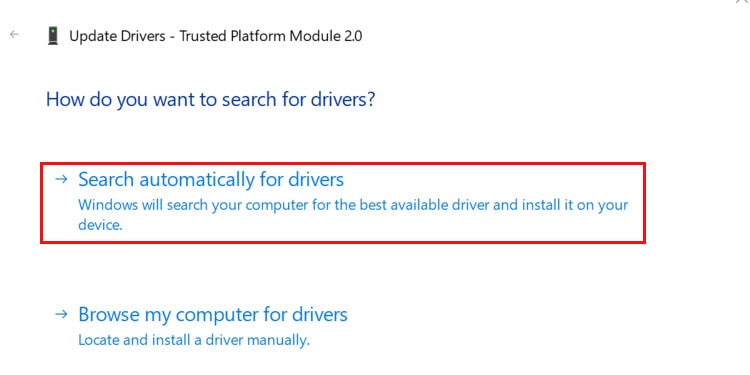
- Proceed to search automatically for the TPM 2.0 driver.
Finally, reboot your computer and see if it solved your problem.
Restart the VGS Windows Service
If the issue still persists, you need to restart the Windows Service vgs.
- Force close both Valorant and Riot Vanguard from task manager.
- Press Windows Key + R to open Windows Run.
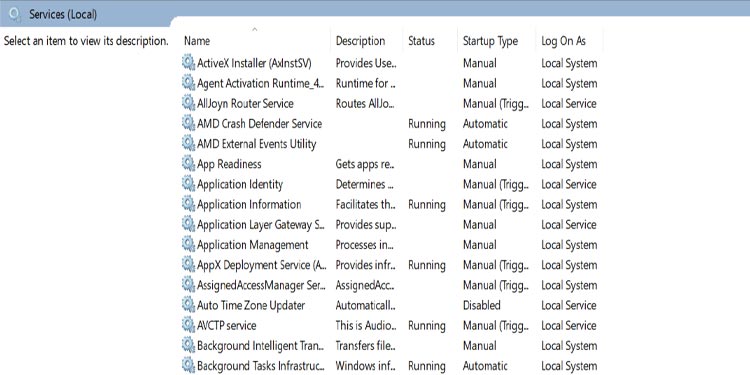
- Search for “services.msc” in the search box of windows run.
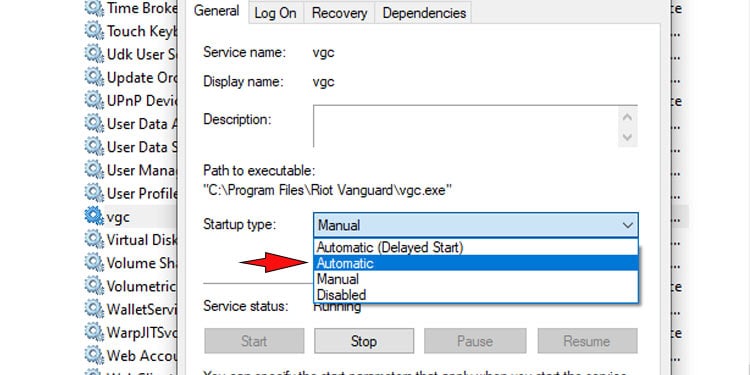
This will display all your windows services that are available to you. - Locate the service name “vgc” and assign the start-up type to automatic.
- Start and apply the changes, and again reboot your computer.
After implementing all these steps. You should be able to launch and play the game. If the problem still persists, move on with other fixes mentioned below.
Update Your Windows
Check for any new updates and make sure you install those. Windows update comes with various driver updates and bug fixes . Hence keeping your system upto date helps solve any sort of errors with your game.
To update your windows:
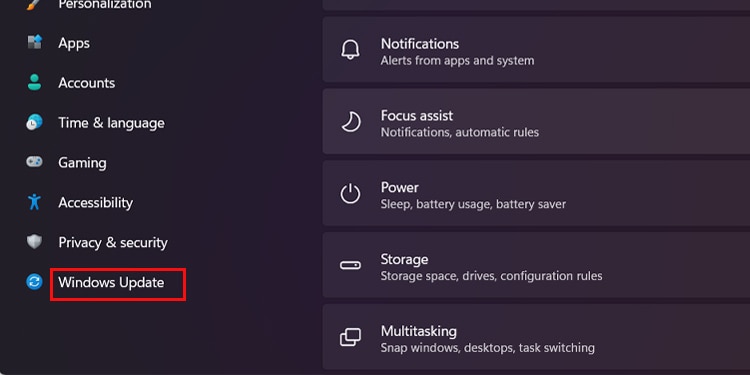
- Go to settings and click on Windows Update.
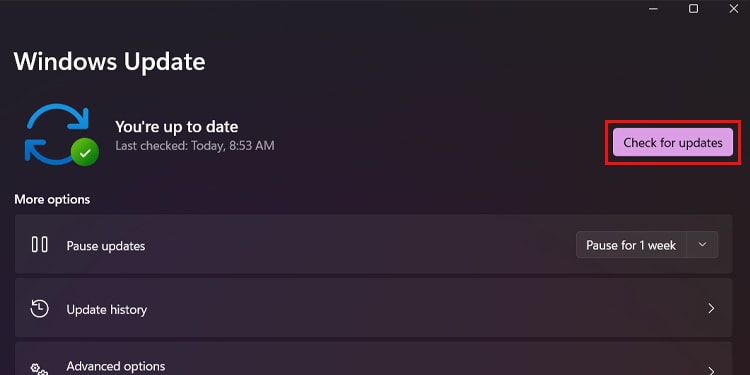
- Select and click the “Check for update” button for installing any new or pending updates.
- Reboot your computer and see if the issue is fixed yet.
Update Device Drivers
In some cases, updating the windows might not suffice. Here, you may need to update the device drivers individually. Updating drivers enhances device performance and also helps to communicate better with the software.
Here’s what you need to do:
- Navigate to the windows icon and right click on it.
- Click on “Device Manager” from the list.
- A list of connected devices will be displayed.
- Right-click on the device name to update its driver.
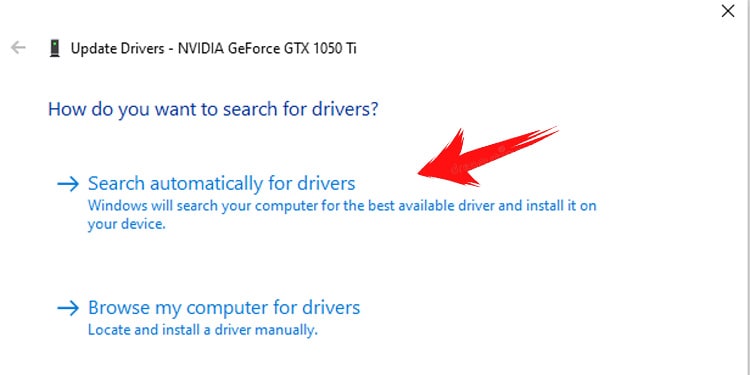
- Proceed to Search automatically for drivers.
- Click close once the driver is updated.
Change DNS to Public DNS
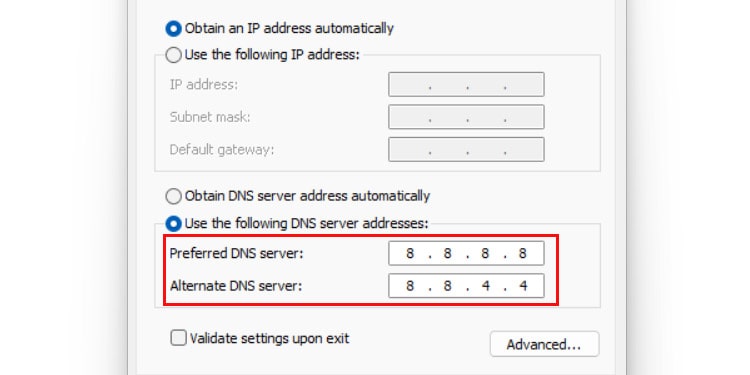
Changing DNS to public helps maintain a connection between your computer and Valorant Servers. ISP struggles to keep their DNS servers up and DNS provided by ISP are not up to date either. Not changing the DNS to a public DNS IP address can hamper server connectivity.
- Navigate to the Control Panel and select Network and Internet.
- Proceed to the Network and Sharing Center.
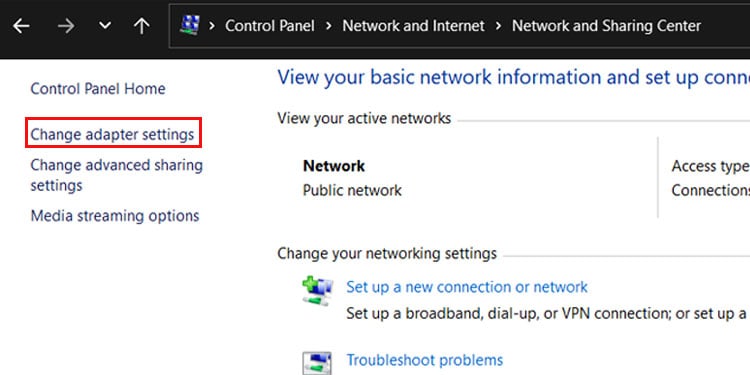
- Open Change adapter settings.
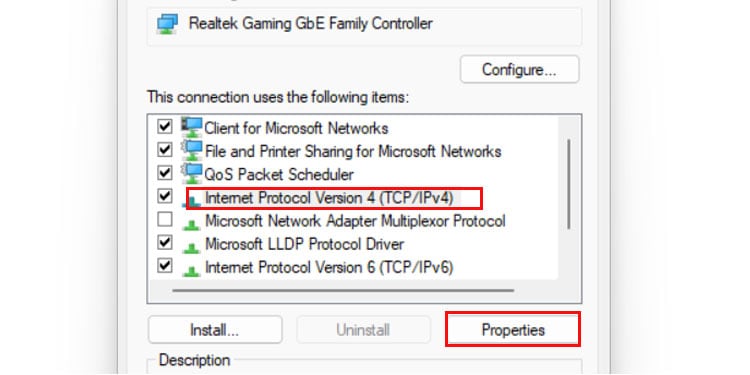
- Right-click on the connection and select Properties.
- Proceed to IPv4 and go to its properties.
- Remove the existing DNS address and replace with public IP Address DNS (i.e., 8.8.8.8, 8.8.4.4.).
Disable CPU Virtualization
Sometimes disabling CPU virtualization or any equivalent setting in the BIOS menu may fix the issue. CPU virtualization is mostly used for running Virtual Machines. Here’s how you can disable them:
- Open up BIOS settings using Hotkeys
- Select Security
- Navigate your way from System security to Virtualization Technology.
- Disable CPU Virtualization.
- Save and Exit.
- Reboot your computer.
Likewise, turn off Windows Hypervisor Platform, Windows Hyper-V, or anything that falls under Virtualization. These features are under “Turn Windows Features on or off” in the control panel.
Disable Startup Applications Such as Discord and Others
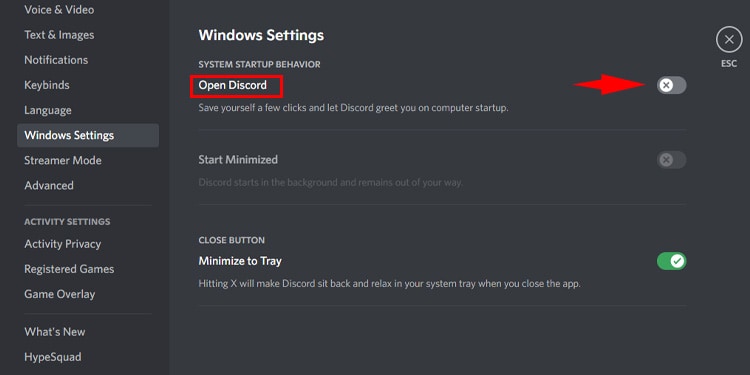
Sometimes, applications like discord can interfere with Valorant and cause the VAN 1067 error. Hence, disabling those apps from starting up in the first place could do the trick for us. Also, Disable all other start-up programs like Blitz that are not necessarily important.
Here’s how you can disable discord and any other apps from startup:
Using Task Manager
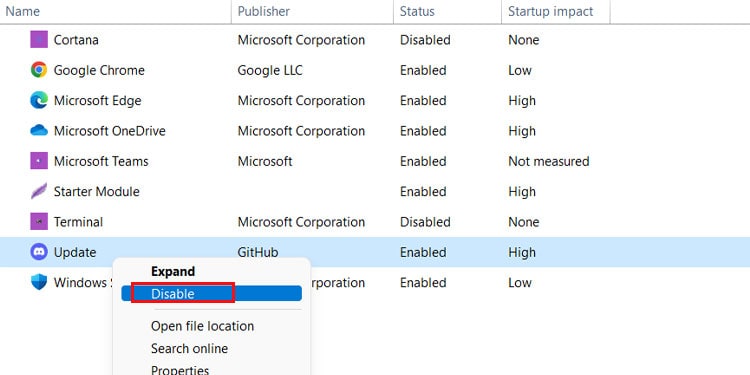
- Open Task Manager and click on startup tab.
- Select and right click on Discord, then click on disable .
Do the same for any other apps you want to disable from starting up automatically.
Using In App Settings
You can even disable the discord or any other apps from auto startup through their in app settings. Here’s how you can do it:
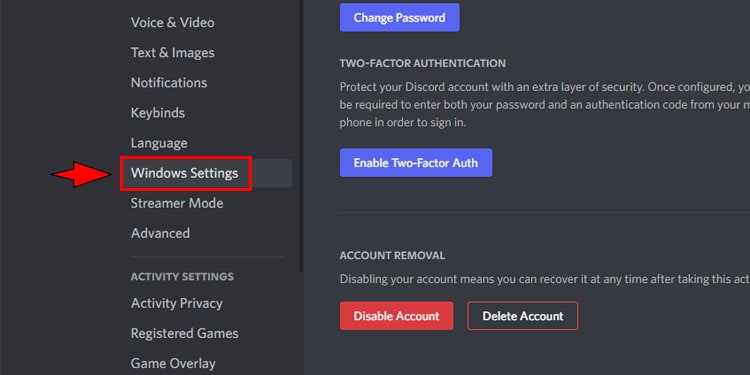
- Head to the Discord User Settings(a small wheel on the bottom left) and click on Windows Settings.
- Under System Startup behavior, uncheck Open Discord.
- Reboot your computer.
Deactivate or Uninstall Antivirus
Antivirus such as SMADAV can also cause this issue. So, uninstalling the antivirus and reinstalling the game can be a possible fix.
Use Ethernet Cable
Use ethernet if you are not already using it. This can help establish a stable connection. And reduce interference between your router and computer.
Restart Router/Modem
Turn off your router or modem and wait for a few mins before turning it on. This might help fix any router related issues.
Run the Game as an Administrator
Running Valorant as administrator gives full access to the application to make any changes and use its features. To run the game with administrator access, follow these steps:
- Select and right-click on the Valorant Icon.
- Proceed to properties
- Go to the Compatibility tab and check the box for “Run this program as an administrator.
- Click Apply and OK.
Reinstall Valorant
Finally, even after implementing all these fixes, if Valorant VAN 1067 error code persists. You will need to uninstall and reinstall the game once and for all.
Roll Back to the Previous Version of Windows
If your game is still not running after reinstalling it, there is some issues with the windows itself. Your windows version is not compatible with the game. Roll back to the older version of windows and see if the error goes.
This is only possible through settings if you have upgraded to windows 11 within last 10 days. You also need to have previous windows version file available to do so. If you have upgraded your windows before that then you need to make a clean install of Windows 10.
Here’s how you revert back to your old windows version from settings:
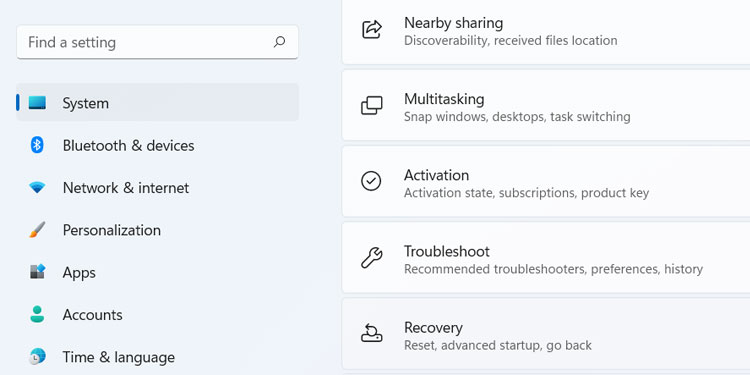
- Search for settings in the search bar.
- On the left panel, select System.
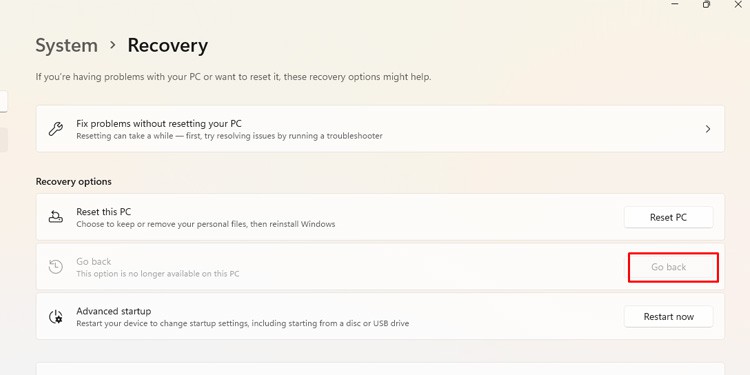
- Go to Recovery.
Make sure to back up your data before moving forward. All your current data will be lost after you roll back to your previous windows. - Under Recovery Options, Click on Go back.
If this option is active then you can revert back from here. If this option is not active or if you cannot find it there then you cannot restore Windows 10 from here and you need to clean install the required version of OS.
FAQs
What is the VAN Error Code in Valorant?
To simply put, Van Error is simply a term used for connection error in Valorant. You will face a Van Error Code commonly in Valorant when there is an unstable or poor connection between your system and the Valorant server. The game will refuse to launch as the errors pops up requesting you to restart your game client.
The most common Van Error Code faced in Valorant is VAN 1067. It is the most common Error when the user upgrades the system from Windows 10 to 11.
Here is the list of other van error codes that are relevant in the game:
- VAN -1
- VAN 0
- VAN 1
- VAN 6
- VAN -81
- VAN -102
- VAN -104
- VAN 128
- VAN 138
- VAN 152
- VAN 1067
- VAN 9002
