Millions of gamers use Steam to download and play their favorite games on a daily basis as steam is the most popular digital storefront and game launcher right now.
When it comes to anticipating the needs of the users, developers on steam must be extremely thoughtful. Along with meeting everyone’s expectation, the platform should also make sure it is safe and easy to use for all. And as such, they are constantly bringing out new features for their users.
However, to use these features, you need to update your Steam client to its latest version. Now, for most users, updating the Steam client is an automatic task, and Steam will automatically download and install any new updates when you launch the app. But, for some reason, if your Steam isn’t updating automatically, you can update it manually as well. To do so,
- Launch the Steam client app on your PC, and once it’s opened, click on the Steam menu from the top-left corner.
- Now, select the Check for Steam Client Updates option.
How to Update Your Steam Games?
Updating the client does not automatically update the game. While the above steps is to update the game client, here you will learn how to update individual games. As the game rolls out various updates regularly, downloading them will keep you in line with the rest of the players.
- Open the Steam client app and click on the Library tab to view all your games.
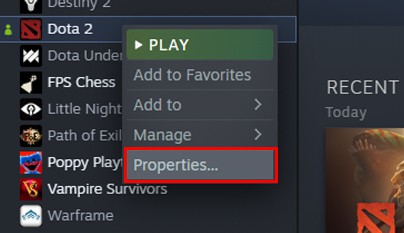
- Now, right-click on the game that you want to update and select Properties from the drop-down menu.
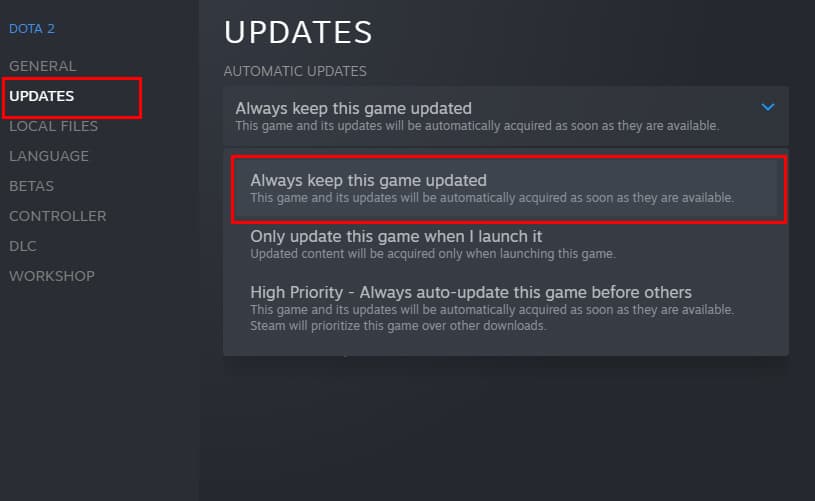
- Once the Properties window shows up, click on the Updates tab.
- Under Automatic Updates, select the Always keep this game updated option.
- If you don’t want to download updates while you’re in the game, you can modify that setting under the Background Downloads section.
Your selected game will now be automatically updated whenever you launch Steam. You can also update your games manually by clicking the Update button. If any game needs updating, you’ll be able to see an Update Queued mark next to them.


